Hi Readers,
For a while now we got this great new menu structure called the ribbon. It was introduced to Office back in 2007 and Microsoft Project got the treatment in its 2010 installment. Microsoft even helped users that were used to the old menu with this handy link, that I tweeted about a lot in early 2011, that switches between the old 2007 and the “new” 2010 ribbon.
This post is a “how-to guide” to build a custom Ribbon UI for your own scheduling purposes, based in my experiences with the tool. However, if you are not technical or my instructions are not clear enough I will gladly mail you the Custom UI file. The only thing I ask in return is that you subscribe to the blog with a valid e-mail address.
Now don’t get me wrong, the ribbon does just what it intends to do; give you a better overview on all the menu options you had stacked away in layers on layers of sub menu’s in earlier versions. Like the project summary task, this used to be hidden behind Tools –> options –> and it’s at the bottom of the View tap. In 2010 and 2013 it can be located on the Format tab in Gantt views.
But still as a user I need to switch multiple menu’s most of the time. Now here is where we come in with a custom UI.
Project Standard or Professional?
Microsoft Project has two versions. A Standard, and a professional version. Although you will be able to do more with the Pro version all of the options I use in the UI (except for build team) are available in both versions. For a complete comparison between the versions please view this PDF for 2010 and this site for 2013.
Getting started
Building the custom UI isn’t rocket science. But you do need to know your way around the application. I assume you know where the backstage is located and which fields you might want to ad yourself. Now for this post I will use the English version of Microsoft Project Professional 2013.If you have a different version some of the menus will look a bit different.
Customize the ribbon menu
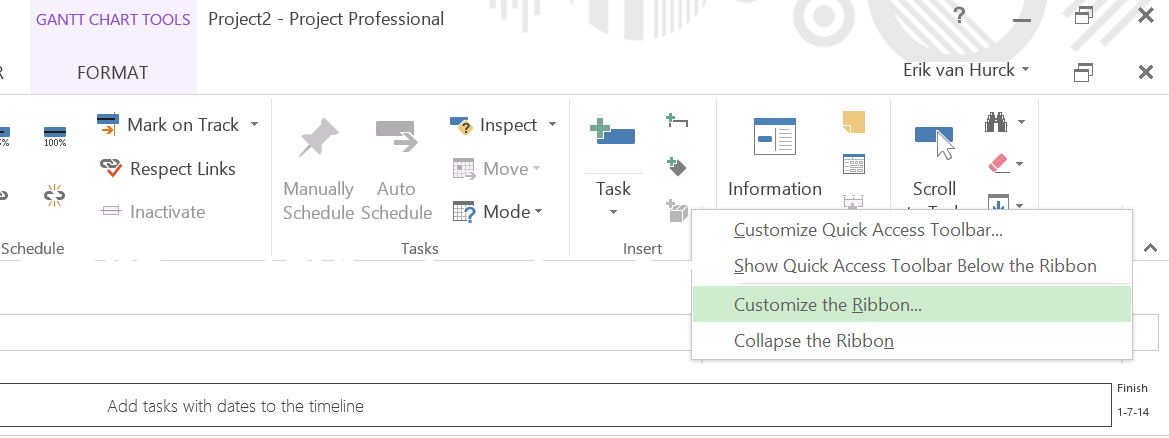
The menu that we will be using extensively is called “customize the ribbon” and can be found within the project options menu (backstage) or by right clicking the ribbon from anywhere on the ribbon tabs:
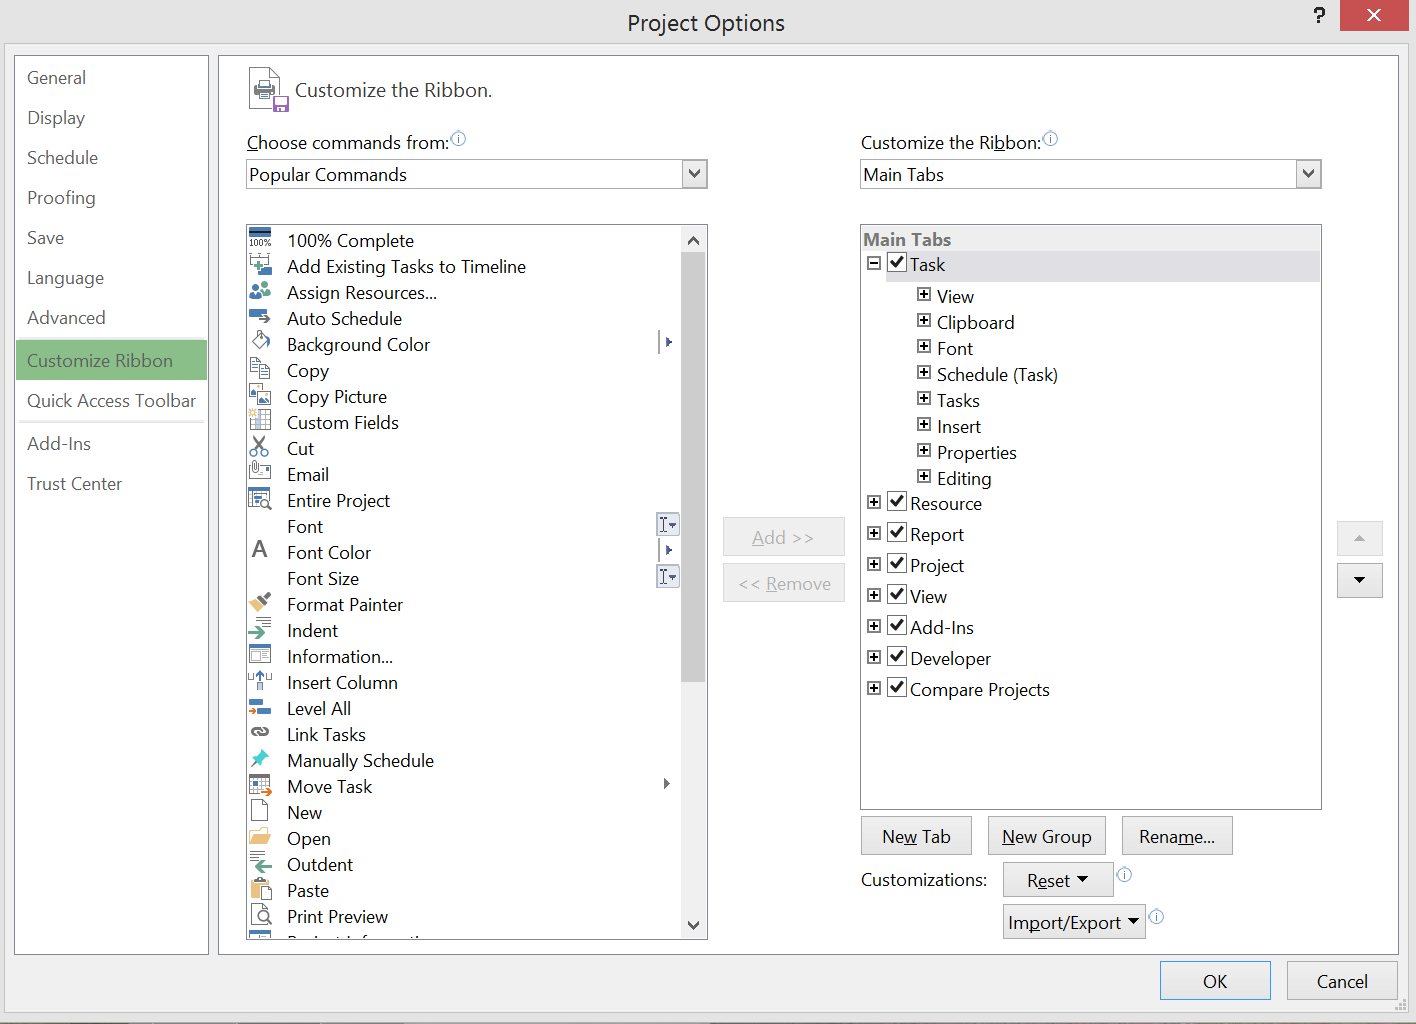
Clicking the option will give you this menu:
Setting up our UI
Now we want to create a personal Tab that holds the most important MS Project options that we use so much. To do this I click on the “New Tab” option in the lower right corner.
Let’s call our Tab “TheProjectCornerUI” for now and move it to be the first tab.
This tab will hold 3 groups, representing different aspects of the project schedule:
- Start up
- Resources
- Execution
- Reporting
Once this is done, the UI should look something like this:
Adding the project commands
Ok, so that is a rather empty Custom UI ribbon. Based on my experience there are a number of commands that every project manager PMO or planner needs to use frequently. To get these commands in the “TheProjectCornerUI” ribbon we go back to the customize menu. Let’s select the “All commands” option in the drop down box on the left, because some of the commands are “special” and not listed in the “popular commands” list on the left. Now you want to select a group from your UI, and add the commands one by one by selecting them from the left and moving them to the right by clicking on “ADD >>”. My suggestions for the fields are:
Start up:
- View Document Properties
- Project Information
- Project Summary Task
- Custom fields
- Manually Schedule
- Auto Schedule
- Set Baseline… (more about baselines)
Resources:
- Share Resources…
- Assign Resources…
- Build team from enterprise…
Execution:
- Outdent
- Indent
- Status Date (more about the Status Date)
- 100% Complete
- Summary
- Task
- Milestone
- Link Tasks
- Unlink Tasks
- Details
- Timeline
- Show Outline
Reports:
- Print Preview
- Copy Picture
- Gant Chart… (Make sure you choose the last one in the list of 3 “Gantt Chart” commands)
- Visual Reports
Now after you have added all these fields, the UI should look like this:
Final remarks
This UI is obviously highly based on my personal and professional preferences. The post is mostly about making you aware of the options for building a custom ribbon UI. This functionality also works on Excel, Word, PowerPoint and almost all other office suite applications by the way :-).
Again, if you subscribe to the blog (with a valid e-mail address) I will send you the Custom UI from this post as a free gift to thank you for your interest in The Project Corner. The UI version is for Project Professional 2013, and as soon as possible I’ll add a 2010 version as well. The mail will include instructions on how to add the UI to your application.
Also, let me know if you build your own Custom UI using the things you learned here. I am curiouse about your creativity. Thank you for reading and hope to get back to you soon with another post.


Is there a way to customize the ribbon and have that customization stored as part of the MPP file (the way I can do using XML with other Office products) so that the customization is there for others that I might distribute the file to?
Hi Darcy, thank you for reaching out to me. To my knowledge the ribbon and the actual shedule (mpp) are different elements of the tool. I haven’t seen or heard any option as you describe it.
But maybe someone reads your comment and has a solution ready, I openly welcome any discussion regarding the subject.
Thanks for reading and responding, have a lovely Christmas and a Happy New year!
Erik
Darcy, you can customize the Ribbon via VBA code so that the Ribbon customizations are generated when the MS Project file (MPP) is started up. A good description for of the VBA code that is needed is located at the following link: https://msdn.microsoft.com/en-us/library/office/ff867065.aspx?f=255&MSPPError=-2147217396
To serve as an example, I am pasting the code that I created for an application that I made:
Public Sub AddCustomUI()
‘From: https://msdn.microsoft.com/en-us/library/office/ff867065.aspx?f=255&MSPPError=-2147217396
Dim customUiXml As String
customUiXml = “” _
& “” _
& “” _
& “” _
& “” _
& “” _
& “” _
& “”
ActiveProject.SetCustomUI (customUiXml)
End Sub
I call the AddCustomUI() function from within the Project_Open() event handler which is located under the “ThisProject” file within the Visual Editor.
Within the BeforeClose() event handler (located in the “ThisProject” file), I call the following function: “RemoveCustomUI” to remove the customizations made to the Ribbon once the MPP file is closed. The code for the RemoveCustomUI() fcn is as follows:
Public Sub RemoveCustomUI()
Dim customUiXml As String
customUiXml = ” ”
ActiveProject.SetCustomUI (customUiXml)
End Sub
I hope the link and examples that I provided help. This code works for MS Project 2010 and MS Project 2013.